I am not going to introduce MVC (Model View Controller) here. Majority of you (web developers) would be already familiar with this through other languages and their frameworks.
Before getting started, you should make sure you have Visual Studio installed. You can use Visual Web Developer 2008, but for this tutorial I will be using Visual Studio 2008. Then next must have is the framework itself. You can download the framework and install it. Once this is done, we are ready to go!
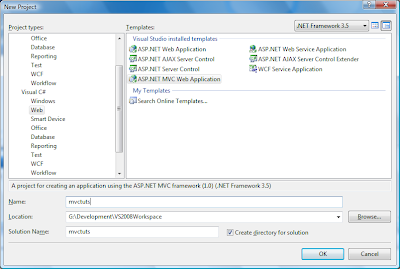
Open up Visual Studio and create a new project. Let's call it "mvctut". Please note that we have selected "ASP.NET MVC Web Application".
Next screen, Visual Studio asks for creating unit test project for testing our application. For this application we will not create a test project and we will select the second option "No, do not create a unit test project".

Once Visual Studio has finished creating our new project, have a look at the solution explorer. You will notice that, the application is well organised into folders and each folder name clearly states what goes into those folders. When the project is created, Visual Studio would create some controllers and views for you. Let's ignore this for time being and get started building our solution: Simply display the "Hello World" string!
To build our application, we will create a new controller, model and view. Our model would be a simple class in this application. Ideally the model would handle more complex data, interact with other data source like database, XML files etc.
Creating a Controller
Right click on the "Controllers" folder and select Add -> New Item. Select "MVC Controller Class" from the list of installed templates and name it HelloController.cs.

Our new controller will have just one method named Index. Now let’s create a model.
Creating a Model
Our application need not have a model (it's a very simple application). But to grab the basics, we will add a model. To create a new model, right click on the "Models" folder and select Add -> New Item. Select "Class" from the list of installed templates and name it Hello.cs. We will just add a constructor a variable to the model as shown below:
namespace mvctut.Models
{
public class Hello
{
public String StringValue { get; set; }

public Hello()
{
StringValue = "Hello World!";
}

}
}
Creating a ViewLet's build a simple aspx page where we will be coding our view. To create a view, right click on the "Views" folder and add a new folder called "Hello". Now, right click the "Hello" folder and select Add -> New Item. Select "MVC View Content Page" from the list of installed templates and name it Index.aspx.

When you create a view page from MVC View Content Page template, you will be asked to select a master page. All MVC web applications will have the master page in Views/Shared folder of the respective project.
Now we have all components of our application created, we need to tighten the bolts and run the application. First, we will modify our controller. Open our controller and we will instantiate our model class in Index method. You access our model we will have to add:
using mvctut.Models;And modify our Index method as shown below:
namespace mvctut.Controllers
{
public class HelloController : Controller
{
//
// GET: /Hello/

public ActionResult Index()
{
Hello stringOjbect = new Hello();
ViewData["HelloStr"] = stringOjbect.StringValue;
return View();

}
}
}
Basically the code we added simply moves the data to an object (ViewData) which will be used by our view to display the string. Now open up our view (Index.aspx) and add:<%= ViewData["HelloStr"]%>to the “MainContent” content control. The final code is shown below:
<%@ Page Title="" Language="C#" MasterPageFile="~/Views/Shared/Site.Master" Inherits="System.Web.Mvc.ViewPage" %>

<asp:Content ID="Content1" ContentPlaceHolderID="TitleContent" runat="server">
Index
</asp:Content>

<asp:Content ID="Content2" ContentPlaceHolderID="MainContent" runat="server">

<h2>Index</h2>
<%= ViewData["HelloStr"]%>

</asp:Content>
And we are all set to run the application! But before we do that, we need to know how this application works, right? If you are familiar with java frameworks like Struts or Spring you know that the page navigation is described in a xml file. In ASP.NET this is configuration is described in Global.asax file as:
routes.MapRoute(
"Default",                                              // Route name
"{controller}/{action}/{id}",                           // URL with parameters
new { controller = "Home", action = "Index", id = "" }  // Parameter defaults
);
We can define our own routing maps but for this example we will use the default one. You can learn more about routing and its configuration at asp.net tutorials.Running our first application is simple and easy. Hit F5 and the application get executed. To see our output you will have to manually navigate to http://localhost:<yourport>/Hello.
