December 29, 2009

How To use GroupHeaderGrid Ext JS plugin

GroupHeaderGrid is a custom plugin that implements support for grouping columns in a grid. When you are serious about using ExtJS on your application, I am sure many of you will come across this requirement where you need to group the column headers in display of records. The plugin do not have specific site but was born out collaboration in the Ext Js forum. It all started with this thread. We will have look at how to use the plugin and some simple examples.

Getting the Plugin
You can find few versions listed and available for download in this thread. I will use the plugin the latest version (1.4) which is for Ext JS 3.0. The plugin comes with a CSS and javascript file. The zip file also contains an example.

Installing and Using The Plugin
Installing the plugin is simply copying the script file and CSS file in appropriate directory. These need not be added into the Ext JS folder ( I usually keep the distribution un-touched) and keep separate folders for my extensions and generic components. For example, lets consider a yearly report for a group of companies. The monthly turnover for each subsidy is displayed in the grid. Now, we need to separate data for each quarter.

To use the plugin with the grid you need to create an instance of the plugin and add it to the grid. Here is code snippet for our example:
...
plugins: [new Ext.ux.plugins.GroupHeaderGrid({
rows:[ [                    
{},
{header: 'Q1', colspan: 3, align: 'center'},
{header: 'Q2', colspan: 3, align: 'center'},
{header: 'Q3', colspan: 3, align: 'center'},
{header: 'Q4', colspan: 3, align: 'center'}                    
]]
})]
...
The rows attribute is most important field for the GroupHeaderGrid class. We specify all the header information as rows. In our example, we have only one level of grouped header. The first column ie, Subsidiary is not grouped. The other 12 columns are grouped into quarters. For each grouping we provide the header's label and column span. In the above example, I have provided the header label, column span and text alignment.

If you have another layer of grouped headers, you will have to add an array into the rows attribute. As per the Ext JS forums, the plugin supports unlimited number of headers. I have used only 2 levels so far. Here is the complete example code:
Ext.onReady(function() {
new Ext.Viewport({
layout: 'border',
items: [{
region: 'center',
xtype: 'grid',
title: 'Yearly Report',
store: new Ext.data.SimpleStore({
fields: ['Subsidiary','Jan', 'Feb', 'Mar', 'Apr', 'May',
'Jun', 'Jul', 'Aug', 'Spt', 'Oct', 'Nov','Dec'],
data: [
['OGC', 2300, 4200, 105600, 5000, 15000, 
7000, 8000, 9100, 10000, 11000, 4000, 5000],
['OGH Ltd', 2100, 6700, 209000, 5000, 500,
7800, 8000, 9600, 10600, 11000, 67000,234000],
['T-DEL', 2320, 7100, 240000, 5800, 7500,
7000, 8500, 9200, 10000, 13400, 3300,24000],
['OGC-I&E', 22000, 2300, 1500, 5000, 8300,
7500, 8000, 99900, 10000, 17300, 21000,76000]
]}),
colModel: new Ext.grid.ColumnModel({
columns: [
{header: 'Subsidiary', dataIndex: 'Subsidiary'},
{header: 'Jan', dataIndex: 'Jan'},
{header: 'Feb', dataIndex: 'Feb'},
{header: 'Mar', dataIndex: 'Mar'},
{header: 'Apr', dataIndex: 'Apr'},
{header: 'May', dataIndex: 'May'},
{header: 'Jun', dataIndex: 'Jun'},
{header: 'Jul', dataIndex: 'Jul'},
{header: 'Aug', dataIndex: 'Aug'},
{header: 'Spt', dataIndex: 'Spt'},
{header: 'Oct', dataIndex: 'Oct'},
{header: 'Nov', dataIndex: 'Nov'},
{header: 'Dec', dataIndex: 'Dec'}
],
defaultSortable: true
}),
plugins: [new Ext.ux.plugins.GroupHeaderGrid({
rows: [[                    
{},
{header: 'Q1', colspan: 3, align: 'center'},
{header: 'Q2', colspan: 3, align: 'center'},
{header: 'Q3', colspan: 3, align: 'center'},
{header: 'Q4', colspan: 3, align: 'center'}                    
]]
})]
}]
});
});
And that's it for now.

Read other ExtJS related articles!
December 21, 2009

Installing MySQL Workbench on Ubuntu 9.10

MySQL Workbench is a GUI tool for MySQL database for running queries, data modification and visual design of database. The community version of the software is distributed under
GPL license. Install the application was quiet simple on Ubuntu but it has some catch that I though it's better to share.

Getting MySQL Workbench
Downloading the application is very simple. Both development and GA release is available on MySQL website. I downloaded the latest GA release which is Workbench 5.1.18a. Select "Ubuntu Linux" from the platforms selection and you will be presented with both 32-bit & 64-bit versions. Also, the versions available are designated for Ubnutu 8.04 & Ubnutu 9.04. I downloaded the 32-bit version for Ubuntu 9.04 for installation.

Installing MySQL Workbench
Installing the application is also simple. If you use Gnome, you can simply double click the downloaded deb file and Package Installer will take care of checking dependencies and proper installation. If you prefer the command line you may use the dpkg command and install as follows:
sudo dpkg -i mysql-workbench-oss-5.1.18a-1ubu904-i386.deb
Once installation is complete, you will be able to access the application from Gnome menu as Applications - > Programming -> MySQL Workbench. You will have no trouble loading the application. But once you try establishing connection with your MySQL server you get an error message as follows:

Couldn't load library libmysqlclient_r.so:
libmysqlclient_r.so: cannot open shared object file: No such
file or directory
To fix this you need to create a symbolic for libmysqlclient library. The symbolic link can be created as follows:

sudo ln -sf libmysqlclient_r.so.16.0.0 libmysqlclient_r.so
I had two versions of libmysqlclient version 15 & 16. I created symbolic link for the latest version. And once you are done, re-launch the application it should work fine.

December 03, 2009

Handling calls in Windows Mobile

Last two weekends, I ventured into different kind of project. Away from web application frameworks, Java technology.. I entered into Windows mobile application programming.I decided to play with my HTC HD. My first intention was to play around the TouchFlo interface, but my mind caught on the idea of handling calls on mobile. I decided to make an application that will ignore calls from unwanted callers. Or simply hang up calls that I don't want to receive! Here is how it was built.

To start with I created a Visual C#, Smart Device project in Visual Studio. After playing around, I found that I need TAPI API in order to handle the phone calls. For my project, I used OpenNETCF.Telephony library. You will have to download the library source and build it. Also remember to add the dll into our project's Reference.

Well, I wouldn't explain the UI or other functionalities in this article. Let discuss about handling the call.

Monitoring and Getting the call
In order to handle calls, you will have to use the TAPI library. The first thing you will need to do is initialize the Telephony class provided by the OpenNETCF.Telephony library. Our requirement is to monitor and handle the incoming calls and get its information. Upon receiving any incoming call, my callback function is called where I have the necessary logic to hang up. The code below shows how to Initialize Telephony class, get the incoming calls and register the callback function.
Telephony tapi = new Telephony();
tapi.Initialize();
CellularLine cl = tapi.CellularLine(MediaMode.InteractiveVoice, CallPrivilege.Monitor | CallPrivilege.Owner);
cl.NewCall += new Line.NewCallHandler(callAction);
The Telephony class is initialized using the Initialize method. The CellularLine method gets the voice calls with monitor and owner privileges and finally, the NewCallHandler register callAction method as the callback function.

Handling the call
The callback function will have to code to handle all the incoming calls. During my venture, I tried different call manipulations. The most simple activity was to reject all the calls that I received. The call rejection was done using the API provided by the library itself. Below is my simple call rejection method:
void callAction(Call call) {            
call.Hangup();
}
Well this may not be the case always. My intention was to reject calls from specific numbers. So, I put some conditions into the callAction methods and spiced it up. The phone numbers are read from a simple text file in my mobile phone and loaded into an array when the application starts. When I receive each call, the numbers are checked and actions taken.

Getting call information
I found different ways to get call information. I could use the .Net Compact Framework's SystemState properties or use TAPI library's CallInformation class. In my application I used the SystemState properties as below:
if (checkNumber.CompareTo(SystemState.PhoneIncomingCallerNumber.Trim()) == 0)  {
call.Hangup();
}
The PhoneIncomingCallerNumber return empty string when there is no incoming call. When you get an incoming call, the variable gives you the caller's number.

Trouble and Conclusion
I initially planned to release the complete project code along with the article. But, I decided to release it later due to few troubles I have with the application. Even though the application handles the call, I did notice some glitches. My trouble is I am yet to solve those bugs. I observed some strange behaviour and have not got any response to my discussions at the codeplex or stackoverflow websites.

November 06, 2009

Google releases Closure!


When Gmail was released I was very enthusiastic in knowing how they built the application around the Ajax technology. Since Gmail, Google have released many successful web application to the public and now they have decided to release the core javascript library that they used to build these application.

Introducing the Closure library and javascript tools built by Google to build applications that scale! They are open sourcing these tools to the web development community. The toolkit consists of :

Closure Complier - A javascript compiler that is used to optimize the code. The compiler is said to remove dead code and minimize the code. It also checks the syntax, variable references and warn about javascript pitfalls.

Closure Library - Is a broad, modular and cross browser javascript library. Developers can make use of the wide range of UI widgets and controls, server communication, effects, data structures etc etc..

And finally, the Closure Templates - are web templates that are precomplied to efficient javascript. Interesting part of templates is that they are implemented for both javascript and java! Meaning you can use the same template on client and sever side.

But, I really wonder why they named the library "Closure" as it very related to programming language terminologies. I also wonder why they released it into Google Labs if they have been using it. According to Google the Closure started out as 20% projects and all google applications currently use it. Open sourcing such a tool is a great boon to web developers!

November 05, 2009

Dynamic loading of ComboBox using ExtJS

Ext JS provide us with a very flexible ComboBox widget that can be loaded locally or remotely (dynamic loading). You can also load the combo box from the server in response to an event like changing selection of another combo box. In this article I am going to walk you through an example of dynamically loading a ComboBox in a form.

For example, we have simple form to add details of country. The fields are country name, population and population type. I will keep the first two fields as normal text fields and population type as a combo box. Upon loading of the form, we need to retrieve the population type and load it into the ComboBox.

The first step would be to create a data store (Ext.data.Store) to hold our dynamically loaded data. Lets assume I have a server side method at URL /testapp/poptype.json that fetches the data from some data repository. So, here is our data store:
var ds = new Ext.data.Store({
proxy: new Ext.data.HttpProxy({url: '/testapp/poptype.json',method:'GET'}),
reader: new Ext.data.JsonReader({
root: 'rows',
fields: [ {name: 'myId'},{name: 'displayText'}] 
})
});
Please note that to load the data into the data store, I will have to call the load method. Next, we need to bind this data store to our form. The binding is done through the store attribute when we configure the drop down in the form. Here is our form:
var addCountryForm = new  Ext.form.FormPanel({
id:"addCountryForm",
title:"Add Country Form",
height:300,
closable:true,
style: {margin:5},
frame:false,
items:  [{xtype:'textfield',name:'cname',fieldLabel:'Country Name' },
{xtype:'numberfield',name:'pop',fieldLabel: 'Population'},
new Ext.form.ComboBox({                        
fieldLabel: 'Population Type',
hiddenName:'popType',
store: ds,
valueField:'myId',
displayField:'displayText',
triggerAction: 'all',
emptyText:'Select',
selectOnFocus:true,
editable: false                        
})

],
buttons: [{
text: 'Save'
},{
text: 'Cancel'
}]
});
Now, lets have a look at a sample JSON output:
{
"rows":[
{"myId": "PT1" , "displayText": "Small"},
{"myId": "PT2" , "displayText": "Medium"},
{"myId": "PT3" , "displayText": "Large"}
]
}
Hope this article helped you out. Happy coding!

Read other ExtJS related articles!
June 16, 2009

Change ComboBox's default option using jQuery

I have started heavy use of jQuery in my current project.Today's task was very interesting. I am currently building a data filtering component for my application where form and data display table are loaded dynamically.In this article, I will explain how I did it!

I have a complex form with lots of elements.. In a way, all kinds of element!! User select values from drop down (ComboBox) that are dynamically loaded using Ajax. Upon selecting a value, the next drop down or form element values change or are set. I require to set default values to these dropdowns. Lets take a simple drop down:


<select id="centerTypeDropDown" name="centerType">
<option value="ASC" selected="selected">ASC</option>
<option value="NSC">NSC</option>
<option value="USC">USC</option>
<option value="IKT">IKT</option>
<option value="UCC">UCC</option>
</select>
The default selected value is ASC. In my application, these values are loaded using Ajax and the default values may change when user select other form elements or drop down. So, in short, new elements get added into this drop down and the selected value changes. For our example, let's say we need to set the default selection to USC instead of ASC.

Using jQuery I can change the default selection to the required option. Here is how to do it:

$("select#centerTypeDropDown option[selected]").
removeAttr("selected");
$("select#centerTypeDropDown option[value='USC']").
attr("selected", "selected");
That's it! For jQuery beginners, selector string is the magic string. selector returns a object or collection of objects. Using selectors, I can select any DOM object and then use appropriate methods to manipulate its properties. In this case, I need to change the selected attribute to another option. The first line for code is used to select the current selected value in the drop down and then by using the removeAttr method, I remove the attribute from the option tag. The second line of code is used to set the new selected value. I select the same object again then use attr method to set the appropriate attribute.

The above code works fine when we know exactly what our new default value is. What if we get the values and default value from the server dynamically? For example my JSON returned from the server contains new or additional options and default value. Note that, in above code we specify which option to be selected in the sector string through option[value='USC']. In our case, we cannot hard code the selector string, instead we create it dynamically.

var selectorSrting = 
"select#centerTypeDropDown option[value='"+ defaultValueObtainedFromServer + "']";
$(selectorSrting).attr("selected","selected");
And that's our final code! Let me know if there are better solutions to this problem. And intersted readers, watch out for the next article on dynamically loading ComboBox using jQuery.

June 07, 2009

Converting Double to String without E notation

Last week, I got a task of creating a data loader for one of application. The huge data was presented to me in the form of excel files and for sure there is no better way than using program to read the excel files and load the data to database. I jump started to build the loader application using the Apache POI library. The data types of table schema and data read from the excel didn't match!

There is the trouble: A numeric field in excel files was represented as string in database. Even though this number was not used for calculation, it seems for some reason, the database designer has kept it that way! Trouble started when the POI library's getNumericCellValue() method returned the numbers in the form of scientific notation. The number 12,345,600 would be returned as 123.456E5. But I need it in plain text 1245600 without scientific notation and grouping of numbers!

Solution to this problem lies in configuring NumberFormat or DecimalFormat class found in the package java.text. Here is solution code:


Double comSysNumber = cell.getNumericCellValue();
NumberFormat f = NumberFormat.getInstance();
f.setGroupingUsed(false);
String refinedNumber = f.format(comSysNumber);
Now the string variable refinedNumber is all set to be stored into my database :-). Hope this becomes useful to others.

May 05, 2009

Windows 7 RC is available for download


Its May 5th and as Microsoft promised,they have made Windows 7 release candidate available to the public!The download link is all over the Windows 7 Home page.

You will find instructions and download link for x86 (32-bit) and x64 (64-bit) versions of Windows 7 Ultimate here!


Windows Outreach team did tweet about it as well before the download links went live. Here is some resources that you may need:


My download is still going on... can't wait to try it :)

April 19, 2009

Getting started with ASP.NET MVC

Microsoft recently released the first version of ASP.NET MVC, a MVC framework which is built on top of ASP.NET 3.5. Apparently, they have also released the framework code as open source! What we will do today is learn the basics of the framework by building the famous “Hello World” application with ASP.NET MVC.


I am not going to introduce MVC (Model View Controller) here. Majority of you (web developers) would be already familiar with this through other languages and their frameworks.

Before getting started, you should make sure you have Visual Studio installed. You can use Visual Web Developer 2008, but for this tutorial I will be using Visual Studio 2008. Then next must have is the framework itself. You can download the framework and install it. Once this is done, we are ready to go!

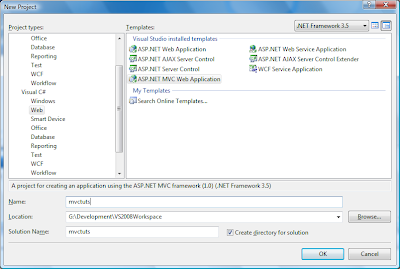
Open up Visual Studio and create a new project. Let's call it "mvctut". Please note that we have selected "ASP.NET MVC Web Application".

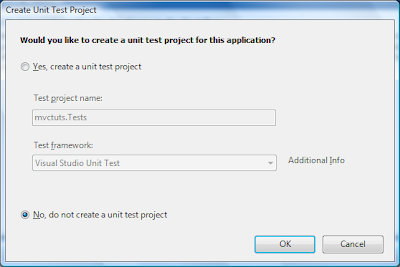
Next screen, Visual Studio asks for creating unit test project for testing our application. For this application we will not create a test project and we will select the second option "No, do not create a unit test project".

Once Visual Studio has finished creating our new project, have a look at the solution explorer. You will notice that, the application is well organised into folders and each folder name clearly states what goes into those folders. When the project is created, Visual Studio would create some controllers and views for you. Let's ignore this for time being and get started building our solution: Simply display the "Hello World" string!

To build our application, we will create a new controller, model and view. Our model would be a simple class in this application. Ideally the model would handle more complex data, interact with other data source like database, XML files etc.

Creating a Controller
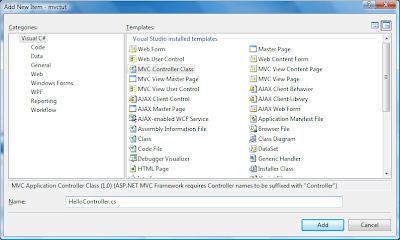
Right click on the "Controllers" folder and select Add -> New Item. Select "MVC Controller Class" from the list of installed templates and name it HelloController.cs.

Our new controller will have just one method named Index. Now let’s create a model.

Creating a Model
Our application need not have a model (it's a very simple application). But to grab the basics, we will add a model. To create a new model, right click on the "Models" folder and select Add -> New Item. Select "Class" from the list of installed templates and name it Hello.cs. We will just add a constructor a variable to the model as shown below:


namespace mvctut.Models
{
public class Hello
{
public String StringValue { get; set; }

public Hello()
{
StringValue = "Hello World!";
}

}
}
Creating a View
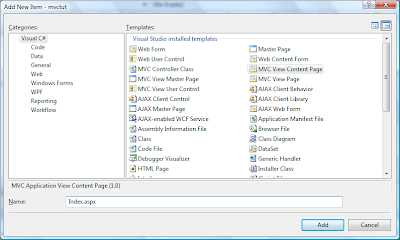
Let's build a simple aspx page where we will be coding our view. To create a view, right click on the "Views" folder and add a new folder called "Hello". Now, right click the "Hello" folder and select Add -> New Item. Select "MVC View Content Page" from the list of installed templates and name it Index.aspx.

When you create a view page from MVC View Content Page template, you will be asked to select a master page. All MVC web applications will have the master page in Views/Shared folder of the respective project.

Now we have all components of our application created, we need to tighten the bolts and run the application. First, we will modify our controller. Open our controller and we will instantiate our model class in Index method. You access our model we will have to add:

using mvctut.Models;
And modify our Index method as shown below:

namespace mvctut.Controllers
{
public class HelloController : Controller
{
//
// GET: /Hello/

public ActionResult Index()
{
Hello stringOjbect = new Hello();
ViewData["HelloStr"] = stringOjbect.StringValue;
return View();

}
}
}
Basically the code we added simply moves the data to an object (ViewData) which will be used by our view to display the string. Now open up our view (Index.aspx) and add:

<%= ViewData["HelloStr"]%>
to the “MainContent” content control. The final code is shown below:


<%@ Page Title="" Language="C#" MasterPageFile="~/Views/Shared/Site.Master" Inherits="System.Web.Mvc.ViewPage" %>

<asp:Content ID="Content1" ContentPlaceHolderID="TitleContent" runat="server">
Index
</asp:Content>

<asp:Content ID="Content2" ContentPlaceHolderID="MainContent" runat="server">

<h2>Index</h2>
<%= ViewData["HelloStr"]%>

</asp:Content>
And we are all set to run the application! But before we do that, we need to know how this application works, right? If you are familiar with java frameworks like Struts or Spring you know that the page navigation is described in a xml file. In ASP.NET this is configuration is described in Global.asax file as:

routes.MapRoute(
"Default",                                              // Route name
"{controller}/{action}/{id}",                           // URL with parameters
new { controller = "Home", action = "Index", id = "" }  // Parameter defaults
);
We can define our own routing maps but for this example we will use the default one. You can learn more about routing and its configuration at asp.net tutorials.

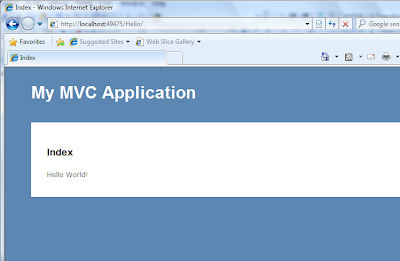
Running our first application is simple and easy. Hit F5 and the application get executed. To see our output you will have to manually navigate to http://localhost:<yourport>/Hello.

March 11, 2009

Identifying MIME using mime-util library


Mime-util is a very small, easy-to-use MIME detection library for Java. It can be used for any type of Java application and can detect MIME types from different sources like File, InputStream, URLConnection, byte array etc. Recently 1.3 version of the library was released and had a look at it.


The new release brings in some changes in packages by deprecating eu.medsea.util and bringing in eu.medsea.mimeutil package. The library still has the old package for backward compatibility. The MIME detection is based on the Unix magic mime files which is used by Unix file command. When using the library, it actually tries to access this file for detecting the MIME type. For other platforms, the library uses an internal copy of magic.mime file. This is available in eu.medsea.mimeutil

Working with the library is very simple. I tried out a simple swing application where the user will select a file using JFileChooser and the MIME type is detected and displayed. Assuming that you have got the absolute path of the file, here is my code:


FileInputStream fis = new FileInputStream(dataDisplayLabel.getText());
BufferedInputStream bis = new BufferedInputStream(fis);
MimeUtil mimeUtilObject = new MimeUtil();
log.warn("Support for Mark and Reset: " + fis.markSupported());
log.warn("Support for Mark and Reset: " + bis.markSupported());
log.info("Stream size: " + fis.available());
Collection coll = mimeUtilObject.getMimeTypes(bis);
log.info(coll.size());
Iterator itr = coll.iterator();
while(itr.hasNext()) {
MimeType mt = itr.next();
log.info("Media type: " + mt.getMediaType());
log.info("Sub Type: " + mt.getSubType());
}
One important point to note is that FileInputStream does not support mark and reset methods. For MIME detection, you will have to provide a InputStream that supports mark and reset methods. In this case, I have used BufferedInputStream and it is fed into getMimeTypes method. After detection of MIME type all the methods they return a collection. You will have to iterate this collection and get media type and sub type using separate APIs.

Even though this library will not be frequently used, it can be used for validation of files during upload or transfer. It is not always safe to check the file extension and proceed with your program logic. You can download mime-util library from sourceforge.

March 09, 2009

Multiple file upload using RESTful web service (Jersey)

For a web application, requirements comes in very interesting form. A typical challenging task is building a multiple file upload feature into web application. Regular Techno Paper readers know about "Multiple file upload using Struts" and how popular the solution is. Today, we will look at how to upload multiple files using a RESTful web service.

Let’s state the requirement more clearly. We need to provide the facility to upload multiple files on to the server using a REST web service. Users will have an “Add File” button that will present them with another file selection widget. Adding a new widget is done using the same java script we used in earlier articles. Still then, let’s have a look at the HTML coding first:
<html>
<head>
<script>
var fCount = 3;
function addFileElement() {
fCount++;
var fObject = document.getElementById('fileSection');
var text = 'File:';
var tag='<input type="file" name="fileup'+fCount+'" />';
var brk='<br>'
var o1 = document.createTextNode(text);
var o2 = document.createElement(tag);
var o3 = document.createElement(brk);
fObject.appendChild(o3);
fObject.appendChild(o1);
fObject.appendChild(o2);
fObject.appendChild(o3);
}
</script>
<title>Multiple file upload using JAX-RS</title>
</head>
<body>
<form action="jersey/fileupload" method="POST" enctype="multipart/form-data">
<div id="fileSection" >
File:<input type="file" name="fileup0" /><br>
File:<input type="file" name="fileup1" /><br>
File:<input type="file" name="fileup2" /><br>
</div>
<hr>
<input type="submit" value="Upload All files" />
<input type="button" onclick="addFileElement()" value="Add File"/>
</form>
</body>
</html>
The html code is very simple one with a form having action as the REST service’s URL. Also note that the method is POST and encoding type is multipart form. Form’s encoding type must be set to “multipart/form-data” for a file upload. In this example, initially I have provided three file selection fields in the form. On click of the button, a java script method “addFileElement” is called. The method simply creates a new file element and appends it to the form. You can modify this code to suit your requirements like limiting the number of file to a maximum of 7 files etc. You can also provide a facility to remove selected files. These modifications are left for people who will play with my code.

Building a REST web service is very simple. For this article also I have used the Jersey library. To extract files from the form data, I have used the Apache FileUpload module. Now let’s have a look at our REST resource class file:
@Path("fileupload")
public class FileUploadResource {
@POST
@Produces("text/plain")
public String loadFile(@Context HttpServletRequest request) {
String resultStatus="fail";
String fileRepository="I:\\testRepo\\";
if (ServletFileUpload.isMultipartContent(request)) {
FileItemFactory factory = new DiskFileItemFactory();
ServletFileUpload upload = new ServletFileUpload(factory);
List items=null;
try {
items = upload.parseRequest(request);
} catch (FileUploadException e) {
e.printStackTrace();
}
if(items!=null) {
Iterator iter = items.iterator();
while (iter.hasNext()) {
FileItem item = iter.next();
if(!item.isFormField() && item.getSize() > 0) {
String fileName = processFileName(item.getName());
try {
item.write(new File(fileRepository+fileName));
} catch (Exception e) {
e.printStackTrace();
}
resultStatus="ok";
}
}
}
}
return resultStatus;
}

private String processFileName(String fileNameInput) {
String fileNameOutput=null;
fileNameOutput = fileNameInput.substring(
fileNameInput.lastIndexOf("\\")+1,fileNameInput.length());
return fileNameOutput;
}
}
Notice that our resource’s access path is defined as: fileupload. This will match the action path specified in our HTML form. Also notice that we are processing HTTP POST method and not GET. To keep things simple, I am just returning a plain text back to the browser saying “ok” or “fail” as a status to the upload process.

loadFile method is the method called on submit of the form.The method has a injected parameter of type HttpServletRequest. This is to get access to the request object when the method is invoked. From the request we identify if the submitted data is a multipart data and then proceed in access the files in the request object using Apache FileUpload. Since the files are accessed as a List item, we can upload n number of files. The files are extracted using the API provided and stored into an appropriate location.

Let me know what you think of this solution. I am sure there are other methods to achieve the same task using REST web service. Your comments are welcome! You can grab the code as Eclipse project here!

You can enhance this code achieve more intersting things like uploading only image,adding constraint of file size, adding other form elements and validations.

March 05, 2009

Jersey Annotations explained!

Jersey uses Java programming language annotations to simplify the development of RESTful web services. Developers decorate a resource class (a POJO) with HTTP-specific annotations to define resources and the actions that can be performed on those resources. Like I promised in the previous post, here we will be explaining about different annotations a developer needs to know when using Jersey.

Jersey provides just about 19 annotations. Lets get started right away…

@Path – Path annotation value is a relative URI path to the resource. A resource class must have this annotation either at the class level or for the methods defined in the resource class. The annotation also provides the facility for embedding variables and creating URI path templates.

@Consumes – This annotation specifies the media types that the methods of a resource class can accept. It’s an optional one and by default, the container assumes that any media type is acceptable. This annotation can be used to filter the requests sent by the client. On receiving request with wrong media type, sever throws an error to the client.

@Produces – This annotation defines the media types that the methods of a resource class can produce. Like @Consumes annotation, this is also optional and by default the container assumes that any media type can be sent back to the client.

Jersey also provides annotations to specify the request methods and supports 5 methods. They are:

@GET – This is request method designator corresponding to HTTP GET method. Any java method annotated with this will process HTTP GET requests.

@POST – This is request method designator corresponding to HTTP POST method. Any java method annotated with this will process HTTP POST requests.

@PUT – This is request method designator corresponding to HTTP PUT method. Any java method annotated with this will process HTTP PUT requests.

@DELETE – This is request method designator corresponding to HTTP DELETE method. Any java method annotated with this will process HTTP DELETE requests.

@HEAD – This is request method designator corresponding to HTTP HEAD method. Any java method annotated with this will process HTTP HEAD requests.

@HttpMethod – This annotation is another way of specifying HTTP request method. The annotation takes a value which can be any of supported HTTP request method.

Example:

HttpMethod(“GET”)
Public String getUserName() {
return username;
}

@DefaultValue – The DefaultValue annotation is used to define default values of request metadata. The annotation is bound to be used along with PathParam, QueryParam, MatrixParam, CookieParam, FormParam, or HeaderParam annotations. The defaultValue is used if corresponding metadata is not available with the request.

@Context – The Context annotation is used to inject information into a variable or method parameter. Using this annotation, you will be able to inject information like Request, URI information etc.

To extract information from URL,request hearders etc, Jersey provide a set of annotations that make extracting data very simple. They are:

@PathParam – The PathParam annotation is used to extract parameters from the resource URL. URI path parameters are extracted from the request URI, and the parameter names correspond to the URI path template variable names specified in the @Path class-level annotation.

@QueyParam – This annotation is used to extract parameters from URL query parameters. It is mostly used in conjunction with HTTP GET method. When using GET method to send data, the parameters and values are encoded into the URL. QueryParam is used to extract these values and assign them to the appropriate variables.

@FormParam – This annotation is used to extract parameters from a form submission. It is used in conjunction with HTTP POST method.

@CookieParam – Like above mentioned parameter extraction annotations, CookieParam is used to extract values form a cookie.

@HeaderParam – This annotation is used to extract parameters from HTTP header.

@MatrixParam – This annotation is used to extract parameters from matrix URI. You can learn more about matrix URI here.

@Provider – This annotation is used to mark the implementation of an extension interface.

@Encoded – This annotation is used to disable automatic decoding of parameter values. Is this annotation on a method will disable decoding for all parameters.

Well that's all about Jersy annotations. I have some important points for you to remember associated with annotations:

  • Method level annotations override a class level annotation.
  • It is possible to define more that one Media type in @Consumes and @Produces annotations.


I will be back really interesting article related building RESTful service next week.Till them enjoy programming :)

March 02, 2009

Building RESTful web service using Jersey

Jersey is an open source reference implementation of JSR-311. The implementation provides support for annotations defined in JSR-311 and other APIs making it easy for developers to build RESTful web service. In this tutorial we will build a simple Hello World web service using Jersey.

Before we code, let’s have a look at basics.

What is a RESTful web service?

Representational state transfer (REST) is a style of software architecture for distributed hypermedia systems. It’s not a standard but makes use of widely accepted standards like HTTP,HTML, XML and URL.

A client application using REST is viewed as state machine. The client references a Web resource using a URL. A representation of the resource called is returned to the client. It can be HTML, XML, plain text etc.

What is Jersey?

Like I earlier - Jersey is the open source JAX-RS (JSR 311) reference implementation for building RESTful web services. Jersey 1.0.2 implements JAX-RS 1.0 and is shipped with GlassFish server. You can download the jars from Jersey site: https://jersey.dev.java.net/

Building our frist RESTful web service

I have kept our first web service as simple as possible. It would just serve a text “Hello World”! You can grab the source code here. I have used ServletContainer to expose the service. This way you will be able to deploy our service in any servlet container.

In REST, a service is called resource. Jersey provides annotation what make developers job easy and quick. Here is our resource (HelloWorldResource.java):
package rest.resource;
import javax.ws.rs.GET;
import javax.ws.rs.Path;
import javax.ws.rs.Produces;

@Path("helloworld")
public class HelloWorldResource {

@GET
@Produces("text/plain")
public String getMessage() {
return "Hello World";
}
}
Remove the annotations and you get a simple POJO. So, in short what we are doing here is adding some annotations to a POJO and deploying it as a service. Let me explain the annotation you see in the above code.

@Path defines a relative URI path for accessing the service. What you see is a very simple path. JAX-RS allows you to embed variables in URI making it path templates.

@GET annotation designates the request method. JAX-RS supports @POST, @PUT, @DELETE and @HEAD along with @GET method.

@Produces annotation is used to specify the MIME types for a resource representation that is sent back to the client. In our case, we are returning a plain text.

We will discuss other annotation is the coming tutorials. With this, we have out first service ready. To deploy this in a servlet container we need to configure web.xml to process requests coming to the server. In web.xml file, we declare a serlvet-class with appropriate parameters as shown below:
<servlet>
<servlet-name>Jersey</servlet-name>
<servlet-class>com.sun.jersey.spi.container.servlet.ServletContainer</servlet-class>
<init-param>
<param-name>com.sun.jersey.config.property.packages</param-name>
<param-value>rest.resource</param-value>
</init-param>
<load-on-startup>1</load-on-startup>
</servlet>
<servlet-mapping>
<servlet-name>Jersey</servlet-name>
<url-pattern>/jersey/*</url-pattern>
</servlet-mapping>
Please note that in my servlet-mapping, I have the url-pattern as /jersey/*. This is not the only method to specify REST resources class in web.xml. I will explain other methods in a separate article.You can access our new RESTful service using the URL http://localhost:8080/restweb/jersey/helloworld.

January 22, 2009

Configuring Apache Felix to host web applications

I have been doing lot of work on OSGi technologies lately. Recently we have seen many application server move from their core server technologies to OSGi based ones. In this article we will see how to configure Apache Felix to host simple web applications built using JSP and servlet technology.

We have less stuff to do. Thanks to the community, all you need to do is download the necessary bundles, make your WARs an OSGi bundle and finally load all the bundles on an OSGi runtime.

OPS4J community provides us the necessary bundles that help us host WAR files. We will use OPS4J three projects: Pax Web, Pax Web Extender and Pax logging.

Pax web is a OSGi R4 HTTP Service implementation using Jetty 6.

Pax Web Extender is a project that extends and adds more functionality to Pax web. The extender project has three modules: Pax Web Extender – War, Pax Web Extender – Whiteboard and Pax URL. We will be using the Pax Web Extender – War bundle. The bundle that makes possible to deploy WAR files into OSGi runtime.

And finally, Pax logging provides an OSGi logging service and API. It is built on top of log4j and supports Jakarta Commons Logging API, Log4J Logger API, JDK Logging, Avalon Logger API, Knopflerfish Log and Tomcat Juli in both your own code and in third party libraries.

You can download these from OPS4J site.

Build your web application on any IDE or compile it into a war using Ant. But before deployment we need to ensure that the archive is a valid bundle. To make the web application a bundle we need to have the following manifest headers in META-INF/MANIFEST.MF.

Bundle-ManifestVersion: 2 -- This header defines that the bundle follows R4 specification.
Bundle-SymbolicName -- This header specifies a unique, non-localizable name for the bundle.
Bundle-ClassPath –- This header specifies list of all JAR and resources in your bundle. Each entry is separated by comma and the root directory is represented by period. Example: Bundle-ClassPath: .,WEB-INF/classes,lib/commons-logging.jar,lib/spring.jar
Import-Package -- This header defines the list of packages that your application depends on. All necessary J2EE packages would come here.

Additionally, you can have some optional headers like
Webapp-Context -- The header defines the context path. Please note that this is not a standard OSGi header.

You may also include other standard OSGi headers for adding information to the bundle. Once you have the WAR file with modified manifest information we are ready to deploy our application. Deployment is simple the installation of the bundle.

You can install the bundle using the install command from the Felix shell or modify the conf/config.properties. Once installed, check if the bundle’s state is active and then access your web application using your browser.

Caution: Please note that, if you have created your WAR using Netbeans you will have sun-web.xml. More than one configuration file causes resource registration failure in Pax Web Extender. You will have to remove this file.

For now we have only used one of the modules from Pax Web Extender. You may try other modules as they also provide interesting functionalities for a developer.

January 15, 2009

Building a "Hello World" service using iPOJO

iPOJO stands for injected POJO. It’s a component model from Apache on top of OSGi. It is very flexible, extensible and easy to adapt. It removed the overhead of developer handling services in OSGi. Let’s have a look how to build a simple service using iPOJO and consume it.

OSGi is about modularizing your application. In our demo, we will have three projects (or three bundles) that will be deployed on Apache Felix. I suggest you download the following tools and ligraries before we start out with our project.
1.Apache Felix: http://felix.apache.org/
2.iPOJO library: http://felix.apache.org/
3.Ant: http://ant.apache.org/
4.Bnd tool from aQute: http://www.aqute.biz/Code/Bnd

The Problem Statement

Our problem is going to be very simple. Our service is a simple OSGi service that will display the string “Hello World”.

Getting Started

Like any OSGi service, our service is represented as an interface:
package hello.service;
public interface HelloService {
public String sayHello();
}
This will be our first project or first bundle. The bundle will have just the interface. Please note that you will have to export hello.service package when building the bundle. To make this task easy, use the bnd tool to create the jar. I have used Ant script to compile and package the projects. Once bundle is ready, you will use it as a dependency library for compiling other projects.

Implementing our service

The next step is to implement our service. We will create a new project with previous projects jar file as a dependency. The service implementation is also POJO and there is no mention of OSGi service in the code. Let’s have a look at our implementation:
package hello.component;
import hello.service.HelloService;
public class HelloComponent implements HelloService {
String message = "Hello World";
public String sayHello() {
return message;
}
}
Now we define that we have a iPOJO component. This is done through a xml that is placed along with the project. The xml defines that, we have a component of the class hello.component.HelloComponent. The example below is a very simple one, you can have callbacks, properties set etc in this xml using different xml elements.
<ipojo>
<component classname="hello.component.HelloComponent">
<provides/>
</component>
<instance component="hello.component.HelloComponent"/>
</ipojo>
We will compile this project into another bundle that will be deployed in the runtime.

Using our Service

This is our final project. This project will be consuming the service we created above. The client can be a POJO or a Activator class. Like the service implementation code, we do not code for a service. Instead we go about and code as if the implementation is available to us. iPOJO framework would take care of the rest. Here is our "hello world" client:
package hello.client;
import hello.service.HelloService;
public class HelloClient {

private HelloService m_hello;

public HelloClient() {
super();
System.out.println("Hello Client constructor...");
}

public void start() {
System.out.println("Starting client...");
System.out.println("Service: " + m_hello.sayHello());
}

public void stop() {
System.out.println("Stoping client...");
}
}
I have some sys outs to see how our client work. Just like the service project, we have a xml that will define what is the required service, callback functions etc. Have a look at the xml:
<ipojo>
<component classname="hello.client.HelloClient">
<requires field="m_hello"/>
<callback transition="validate" method="start"/>
<callback transition="invalidate" method="stop"/>
</component>
<instance component="hello.client.HelloClient"/>
</ipojo>
The xml specifies that HelloClient requires m_hello to execute. m_hello is a instance of our service. So as long as the service is not available, the HelloClient component do not get executed. The callback xml elements specify which methods to execute when the state of the component changes.

Once compiling and packaging of this project is done, we are ready to deploy our example into a runtime and see it working. If you have Felix and iPOJO framework downloaded. Let’s configure Felix to load our bundles when it’s started.

Felix configurations are placed in config.properties under conf folder.You will have to modify the entires for felix.auto.start.1 variable. Here is how it looked like after I modified:
felix.auto.start.1= \
file:bundle/org.apache.felix.shell-1.0.1.jar \
file:bundle/org.apache.felix.shell.tui-1.0.1.jar \
file:bundle/org.apache.felix.bundlerepository-1.0.3.jar \
file:bundle/org.apache.felix.ipojo-1.0.0.jar \
file:bundle/hello.service.jar \
file:bundle/hello.component.jar \
file:bundle/hello.client.jar
I have put all my jars in felix/bundle folder. You may place them in different location and specify the path.

We are ready now. Run your felix runtime to see the results! You may download the complete project and experiment with iPOJO. Good luck :)