October 11, 2013

Clearing SharePoint Designer Cache


Sometimes, SharePoint Designer just goes haywire! You try to edit or publish a workflow and it says the item cannot be displayed. At times, it even says that the site is disabled to be edited from SharePoint Designer. But, you know what you are doing and are sure that these are just "crazy" errors!

All you need to to fix these kind of issues are to clear the cache and make SharePoint Designer feel that you are starting from scratch. SharePoint Designer's cache is spread around three different folders. Close any running instance of designer and delete all folders and files in the following directories:
  1. C:\Users\<username>\AppData\Local\Microsoft\WebsiteCache
  2. C:\Users\<username>\AppData\Roaming\Microsoft\SharePoint Designer\ProxyAssemblyCache
  3. C:\Users\<username>\AppData\Roaming\Microsoft\Web Server Extensions\Cache
Fire up your SharePoint Designer and you should get a clean start.

April 20, 2013

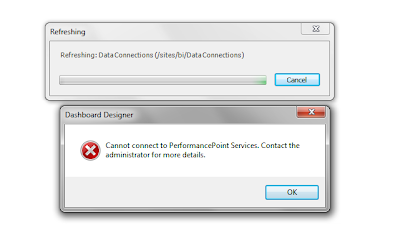
Dashboard Designer: Cannot Connect to PerformancePoint Service

After configuring my PerformancePoint Service on SharePoint 2013. This error hit me when trying to create a new data source from Dashboard Designer.


Here are the steps to make sure you have your PerformancePoint service configured properly.

  1. Make sure you have the PerformancePoint Service and Secure Store Service started.


    You can check this by going to Central Administration | Application Management | Service Applications |Manage services on server
  2. Make sure you have a Secure Store service application running.


     You can check this by going to Central Administration | Application Management | Service Applications | Manage service applications.

    Ensure that you have configured the service application properly.
  3. Make sure you have a PerformancePoint Service application running


    You can check this by going to Central Administration | Application Management | Service Applications | Manage service application.

    Ensure that you have configured the service application properly. Click on your performance point service application to take you to the management screen as shown below:
    Verify you application setting by selecting PerformancePoint Service Application Settings.

    Make sure you have your secure store displayed and you are using your appropriate unattended service account (If you are using the service account, click Change User and reenter the username and password).
  4. And finally check service application associations.

    Go to Central Administration | Application Management | Service Applications | Configure service application associations

    Click on default and ensure that your performance point service is selected.


These steps should ensure that you get your PerformancePoint service up and running.

February 28, 2011

How to execute custom queries on Recess framework

Working with Recess framework can be fun if you are ready to dig into the source code of the framework. Due to its small code footprint, going through the code is no trouble for even a beginner. In this article, we will have a look at how to execute custom mysql query.


Recess framework keeps a registry of data sources available for an application. The Database class provides this registry and provides static methods to access the data sources. The class holds all the data sources in an array. It also has a separate variable to hold the default data source.

The framework does provide you with its own ORM and makes CRUD very simple and zero lines of coding. But there are times when you need to execute complex quires against our data sources. I assume you have set your data source as default in recess-conf.php. Now, to get hold of your PDO object (data source), you can simple call the getDefaultSource method. eg:
$pdo = Databases::getDefaultSource();
And here is an example of executing the query:
$pdo = Databases::getDefaultSource();
$sql = "SELECT * FROM MyTable";
$rows = $pdo->query($sql);
foreach ($rows as $row)
{
 /* Process the selected rows */
}

Other methods of Database class
The Database class also provides access to named data sources through other static methods. You can use the addSource and getSource methods to add and get a named source.

You can get the array containing all the data source using the method getSources. And also set the default data source using the setDefaultSource method.

February 23, 2011

Multiple file upload using ExtJS & ASP.Net MVC

Recently I had to build an image gallery for one of my project which used ExtJS & ASP.Net MVC. The gallery consisted of many components, and I will explain the multiple image file upload functionality used in this gallery.


There are many ExtJS plugins already available for file upload that uses flash. One of my requirements was to avoid flash in my project. So, I could not use plugins like
Awesome uploader or UploadForm. So, if you need some fancy looking component & functionality, I suggest you have a look at them as well!

Here I have a simple uploader form that can be used for any server side. I will be using ASP.Net MVC. I have clean URLs as my application follows REST. Let’s have a look at the javascript first:
UploaderWindow =  Ext.extend(Ext.Window,{
    title: 'Upload Window',
 closeAction: 'close',
 id: 'upload-window',
 folderID: null,
 initComponent : function() {
  
  // Upload Form
  var uploadForm = new Ext.form.FormPanel({
   id: 'upload-form',
         fileUpload: true, 
         frame: true,  
   border: false,      
         bodyStyle: 'padding: 10px 10px 0 10px;',
   labelWidth: 50,
   defaults: {
          anchor: '100%'
         },          
   items: [{
             xtype: 'hidden',
             name: 'fieldCount',
    id: 'fieldCount',
    value: 0             
   },{
    xtype: 'hidden',
    name: 'folderID',
    id: 'folderID',
    value: 0
   },{
             xtype: 'fileuploadfield',
             emptyText: 'Select an image',
             fieldLabel: 'Image',
             name: 'file0'            
   }],
   buttons: [{
    text: 'Add File',
    iconCls: 'add_icon',
    handler: function(button,event) {
      
     var fIndex = parseInt(uploadForm.findById('fieldCount').getValue()) + 1;
     uploadForm.add(newField('file' + fIndex));
     uploadForm.findById('fieldCount').setValue(fIndex);
      
     uploadForm.doLayout();
            
    }
   },{
    text: 'Upload',
    handler: function(button, event){
     
     if (uploadForm.getForm().isValid()) {
      uploadForm.getForm().submit({
       url: '/Gallery/Upload',
       waitMsg: 'Uploading your photo...',
       success: function(form, o){        
        alert('Successfuly uploaded!');
       },
       failure: function(form, o){
        alert('Error in uploading the files');
       }
      });
     }
    }
   },{
    text: 'Cancel',
    handler: function() {
     var win = Ext.getCmp('upload-window');
     win.close();
    }
   }]
  });
  
  // Initial Configuration for the window
  var initConfig = {
   resizeable: false,
   modal: true,
   frame: true,
   width: 400,
   autoHeight: true,
   items: [uploadForm]
  };
  
  Ext.apply(this, Ext.apply(this.initialConfig, initConfig));
        UploaderWindow.superclass.initComponent.call(this);
 },
 onRender: function(){
  var fidField = this.upForm.findById('folderID');
  fidField.setValue(this.folderID); 
  UploaderWindow.superclass.onRender.apply(this, arguments);
 } 
});
I have extended Ext.Window class to create my component. The window provides all the controls necessary to upload multiple files onto the server. The upload form is basically embedded within the window. This helps in reuse of the entire component and also helps in customization. In the new component, we have some custom parameters. Once, such parameter is folderID (the default value is null). But when the upload window is created, I would pass a real value. On the server side, the uploaded images are stored according to the folderID passed.


The initComponent method is used to initialize the component. I have the form panel and its elements defined here. Note that I a hidden field to hold the number of files being uploaded (fieldCount) and is set to zero. I also have a field to hold the folder information. This hidden field is populated when the window is instantiated. The file selection functionality is provided by the well known ExtJS component: FileUploadField.

Each time the user click on “Add File” button, we create a new element of the type FileUploadField. This is done with the help of newField method:
function newField(name) {
    var rulesField = new Ext.ux.form.FileUploadField({
        name: name,
        emptyText: 'Select an image',
        fieldLabel: 'Image'
    });
    return rulesField;
}
Now, let’s have a look at the server side code. Our server side is accessed through the URL /Gallery/Upload and the method will be obviously POST. One of my requirements was to upload only images so; I added a simple check for the file extension on the server side. You could do the same on the client side as will. Here is the server side code:
[AcceptVerbs(HttpVerbs.Post)]
public ActionResult Upload()
{
    string[] supportedTypes = new string[]{ "png", "gif", "jpg", "jpeg" };
    int count = int.Parse(Request.Params["fieldCount"]);
    int folderID = int.Parse(Request.Params["folderID"]);
    
    try
    {
        for (int i = 0; i <= count; i++)
        {
            HttpPostedFileBase postedFile = Request.Files["file" + i];
            if (postedFile != null)
            {
                string x = Path.GetExtension(postedFile.FileName);
                if (supportedTypes.Contains(x.TrimStart('.')))
                {
                   // Process the image
                } else {
                   // document not supported!
                }
            }
        }
        
    }
    catch (Exception e)
    {
        
    }
}
Improvements: There is always space for improvements. You can go ahead with lots of modifications to this component. By end of the day, I had lot of changes. Few improvements are:
  1. Removing added files from the form. 
  2. Client side validations.
  3. Option for entering meta data for the images being uploaded.
  4. Progress bar like other components mentioned above. .. etc 
Your comments are welcome. Enjoy coding! :)

Read other ExtJS related articles!
February 14, 2011

Recess framework - An ignored PHP RAD tool!


My new personal project is being built on PHP stack instead of Java or .Net! My team (group of friends) not I are regular PHP coders and we decided to give PHP a try. Our application needed a simple MVC framework, REST support & small learning curve. During the search I stumbled upon Recess! - A RESTful PHP framework.

Recess! is a RESTful PHP framework that claims to be built for implementing RESTful application with strong object-oriented design, annotations and RAD tools. I decided to give it a try even though we have plenty of famous frameworks like Zend stack, CakePHP, Symphony etc.

I got quite exited after viewing the first screen cast about the framework. At the same time, I was little disappointed to see the framework was versioned 0.2 and dated to 2009. Nevertheless, I decided to download and try. I got my first blockade with the framework in 20 minutes to deploying it on my PC. Turned out that, the version 0.2 had bugs and I had to switch to the cutting edge version. With the latest version, I was running my first application in no time. But when you go beyond “Hello Wold” applications you will find real trouble due to lack of documentation.

The framework introduces annotations to PHP! Unlike java, annotation symbol used is ‘!’ annotation. Applications routing information, data model relationships, etc. are all provided in the form of annotations. In addition to this the framework provides an interactive toll to create application, scaffolding and manage your data models. Yes! You have CLI tools for other frameworks but this is simple and real RAD. Apart from these features, the framework had a plugin architecture and easy to extend.

But, even with these features, I don’t see the framework becoming popular. One reason for this could be the lack of documentation and tutorials. The framework lacks documentation and you will have to read the source code in order to understand and fix your issues. The community is also very small, so you are left out in the cold. This actually takes away the ‘RAD’ in Recess and your learning cure shoots up.

Another reason for lack of community would be because the framework has had very little changes after 2009. With no active development happening, new developers (like me) usually do not try it and end up with other frameworks.

Here is my final take on the framework:
Pros:

  • Create RESTful application quickly and with great ease.
  • GUI based tool for creating project structure, scaffolding etc.
  • Declarative PHP with the help of annotations.
  • Loosely coupled Model-View-Controller.
  • Makes use of Don’t Repeat Yourself (DRY) philosophy & practice.
  • Caching-oriented architecture.
  • Provides a simple ORM library that is integrated into the framework.

Cons:

  • Lack of community interaction and support.
  • Lack of Manuals, tutorials and API documentation.
  • Very slow development of the framework.
  • ORM is still not powerful enough compared to other available libraries.

Recess framework is really good RAD and its developers and community should take it forward. It makes PHP programming real fun!